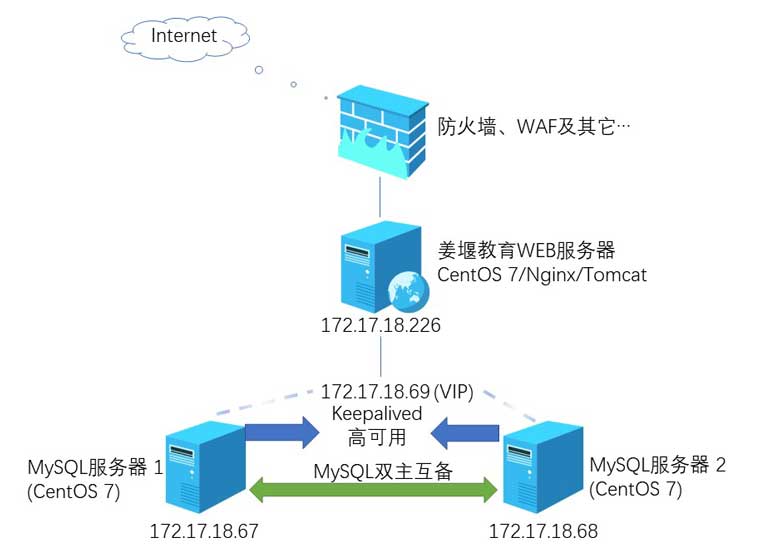
目前实现:
1. 在两个集群中分别布署一台MySQL 5.7数据库服务器(CentOS 7),利用光交将两集群实现互通。
2. 两MySQL已采用双主互备方案,在任一主机上进行增删改操作,另一主机立即同步执行。即两数据库内容无异。
3. 利用Keepalived,对两主机实现高可用处理。虚拟出IP地址172.17.18.69由各应用程序使用。任一MySQL数据库宕机均不会对应用程序发生影响。
4. MySQL宕机时,会立刻发送外部邮件到管理员信箱,以便进行处理。

---------------------------------------------------------
说明:防火墙需要开启vrrp
iptables -A INPUT -p vrrp -d 172.17.18.0/24 -j ACCEPT
MySQL虚机IP:172.17.18.67、172.17.18.68
vip:172.17.18.69
my.cnf
# For advice on how to change settings please see
# http://dev.mysql.com/doc/refman/5.7/en/server-configuration-defaults.html

[mysqld]
#
# Remove leading # and set to the amount of RAM for the most important data
# cache in MySQL. Start at 70% of total RAM for dedicated server, else 10%.
# innodb_buffer_pool_size = 128M
#
# Remove leading # to turn on a very important data integrity option: logging
# changes to the binary log between backups.
# log_bin
#
# Remove leading # to set options mainly useful for reporting servers.
# The server defaults are faster for transactions and fast SELECTs.
# Adjust sizes as needed, experiment to find the optimal values.
# join_buffer_size = 128M
# sort_buffer_size = 2M
# read_rnd_buffer_size = 2M
datadir=/var/lib/mysql
socket=/var/lib/mysql/mysql.sock

# Disabling symbolic-links is recommended to prevent assorted security risks
symbolic-links=0

log-error=/var/log/mysqld.log
pid-file=/var/run/mysqld/mysqld.pid

#此行非常关键,增加后速度提高3倍
innodb_buffer_pool_size = 5G
#innodb_lock_wait_timeout = 50

slow_query_log=ON
slow_query_log_file=/var/lib/mysql/instance-1-slow.log
long_query_time=1


#准备增加
#skip-name-resolve
#key_buffer_size=400M
#innodb_read_io_threads=12
#innodb_write_io_threads=12
#key_buffer_size=400M
#innodb_log_buffer_size=20M
#query_cache_size=40M
#query_cache_type=0
#join_buffer_size = 512M
#read_buffer_size=1M
#sort_buffer_size=4M
#read_rnd_buffer_size=8M
#tmp_table_size=16M
#thread_cache_size=64
#table_open_cache = 512

#以下为双主互备配置
server-id = 1
log-bin = mysql-bin
sync_binlog = 1
binlog_checksum = none
binlog_format = mixed
auto-increment-increment = 2
auto-increment-offset = 1
slave-skip-errors = all
server-id = 2
log-bin = mysql-bin
sync_binlog = 1
binlog_checksum = none
binlog_format = mixed
#binlog-do-db = jyedu
auto-increment-increment = 2
auto-increment-offset = 2
slave-skip-errors = all
show master status;
grant FILE on *.* to 'repl'@'172.17.18.%' identified by '8*9****du';
GRANT REPLICATION CLIENT ON *.* TO 'repl'@'172.17.18.%' IDENTIFIED BY '8*9****du';
flush privileges;

change  master to master_host='172.17.18.68',master_user='repl',master_password='8*9****du',master_log_file='mysql-bin.000002',master_log_pos=0;

start slave;
//修改后
GRANT FILE , REPLICATION SLAVE ,  REPLICATION CLIENT ON *.* TO 'repl'@'172.17.18.%' IDENTIFIED BY '8****edu';

change  master to master_host='172.17.18.168',master_user='repl',master_password='8****edu',master_log_file='mysql-bin.000002',master_log_pos=0;
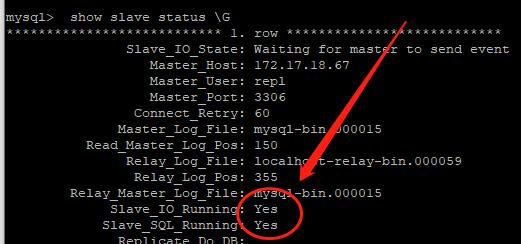
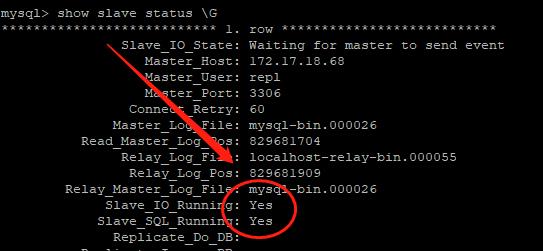
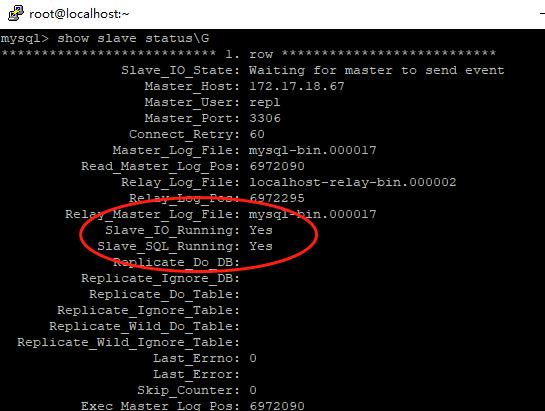
实现目标:在Mysql中执行show slave status \G 时,如在两个MysqL中均能显示如下图两个yes,说明双主互备实现。
Keepalived配置文件keepalived.conf
主机1和主机2区别是priority值和unicast_src_ip及unicast_peer(本机IP和另一机IP)
(1)priority 99
(2)priority 100
! Configuration File for keepalived

global_defs {
   router_id MySQL-HA
   #notification_email {
      root@localhost
   #  failover@firewall.loc
   #  sysadmin@firewall.loc
   #}
   #notification_email_from Alexandre.Cassen@firewall.loc
   smtp_server 127.0.0.1
   smtp_connect_timeout 30
   vrrp_skip_check_adv_addr
   #vrrp_strict
   vrrp_garp_interval 0
   vrrp_gna_interval 0
}

vrrp_script chk_mysql_port {
    script "/opt/chk_mysql.sh"
    interval 2
    weight -5
    fall 2
    rise 1
}

vrrp_instance VI_1 {
    state MASTER
    interface ens192
    virtual_router_id 51
    priority 99
    advert_int 1
    unicast_src_ip 172.17.18.67
    unicast_peer {
         172.17.18.68
    }
    authentication {
        auth_type PASS
        auth_pass 1111
    }
    virtual_ipaddress {
        172.17.18.69
    }
    track_script {
         chk_mysql_port
    }
    notify_master "/etc/keepalived/notify.sh master"
    notify_backup "/etc/keepalived/notify.sh backup"
}
/opt/chk_mysql.sh 文件脚本:
#!/bin/bash
counter=$(netstat -na|grep "LISTEN"|grep "3306"|wc -l)
if [ "${counter}" -eq 0 ]; then
    exit 1
else
    exit 0
fi
执行chcon修改notify.sh的安全环境
chcon -t keepalived_unconfined_script_exec_t /etc/keepalived/notify.sh
在/etc/mail.rc中加入外部邮件信息,以便在发生故障切换时发送邮件通知管理员。
#在/etc/mail.rc中追加
set from=username@163.com
set smtp=smtp.163.com
set smtp-auth-user=username@163.com
set smtp-auth-password=SAFE_PASSWORD
set smtp-auth=login
set ssl-verify=ignore
set nss-config-dir=/etc/pki/nssdb
脚本内容:/etc/keepalived/notify.sh
#!/bin/bash
#接收者邮箱,多个以空格分隔
contact=(27723812@qq.com lzhjy@163.com )
#本机ip
HOST_IP=172.17.18.68
notify() {
    #邮件主题
    mailsubject="姜堰教育MySQL服务器通知:($HOST_IP)转换成($1)"
    #邮件正文
    mailbody="$(date +'%F %T'): vrrp transition, $HOST_IP keepalived changed to be $1"
    for receiver in ${contact[*]}
    do
        #发送邮件
        echo "$mailbody" | mail -s "$mailsubject" $receiver
    done
}
case $1 in
master)
    notify master
    ;;
backup)
    notify backup
    ;;
fault)
    notify fault
    ;;
*)
    echo "Usage:{master|backup|fault}"
    exit 1
    ;;
esac
需要执行一下以下
chcon -t keepalived_unconfined_script_exec_t /etc/keepalived/notify.sh
------------------------------
限制日志的记录天数
show variables like 'expire_logs_days';
set global expire_logs_days=60;
flush logs;
参考:
https://www.cnblogs.com/qizexi/p/9005609.html
https://www.cnblogs.com/benjamin77/p/8682360.html
https://www.cnblogs.com/kiko2014551511/p/11531447.html
https://www.cnblogs.com/l-hh/p/9922548.html <主从错误修复>